This blog is an archive of DKW related articles, manuals, brochures and posts. It also covers East German successor marques, such as IFA, AWZ, Wartburg, Sachsenring, MZ and IWL.
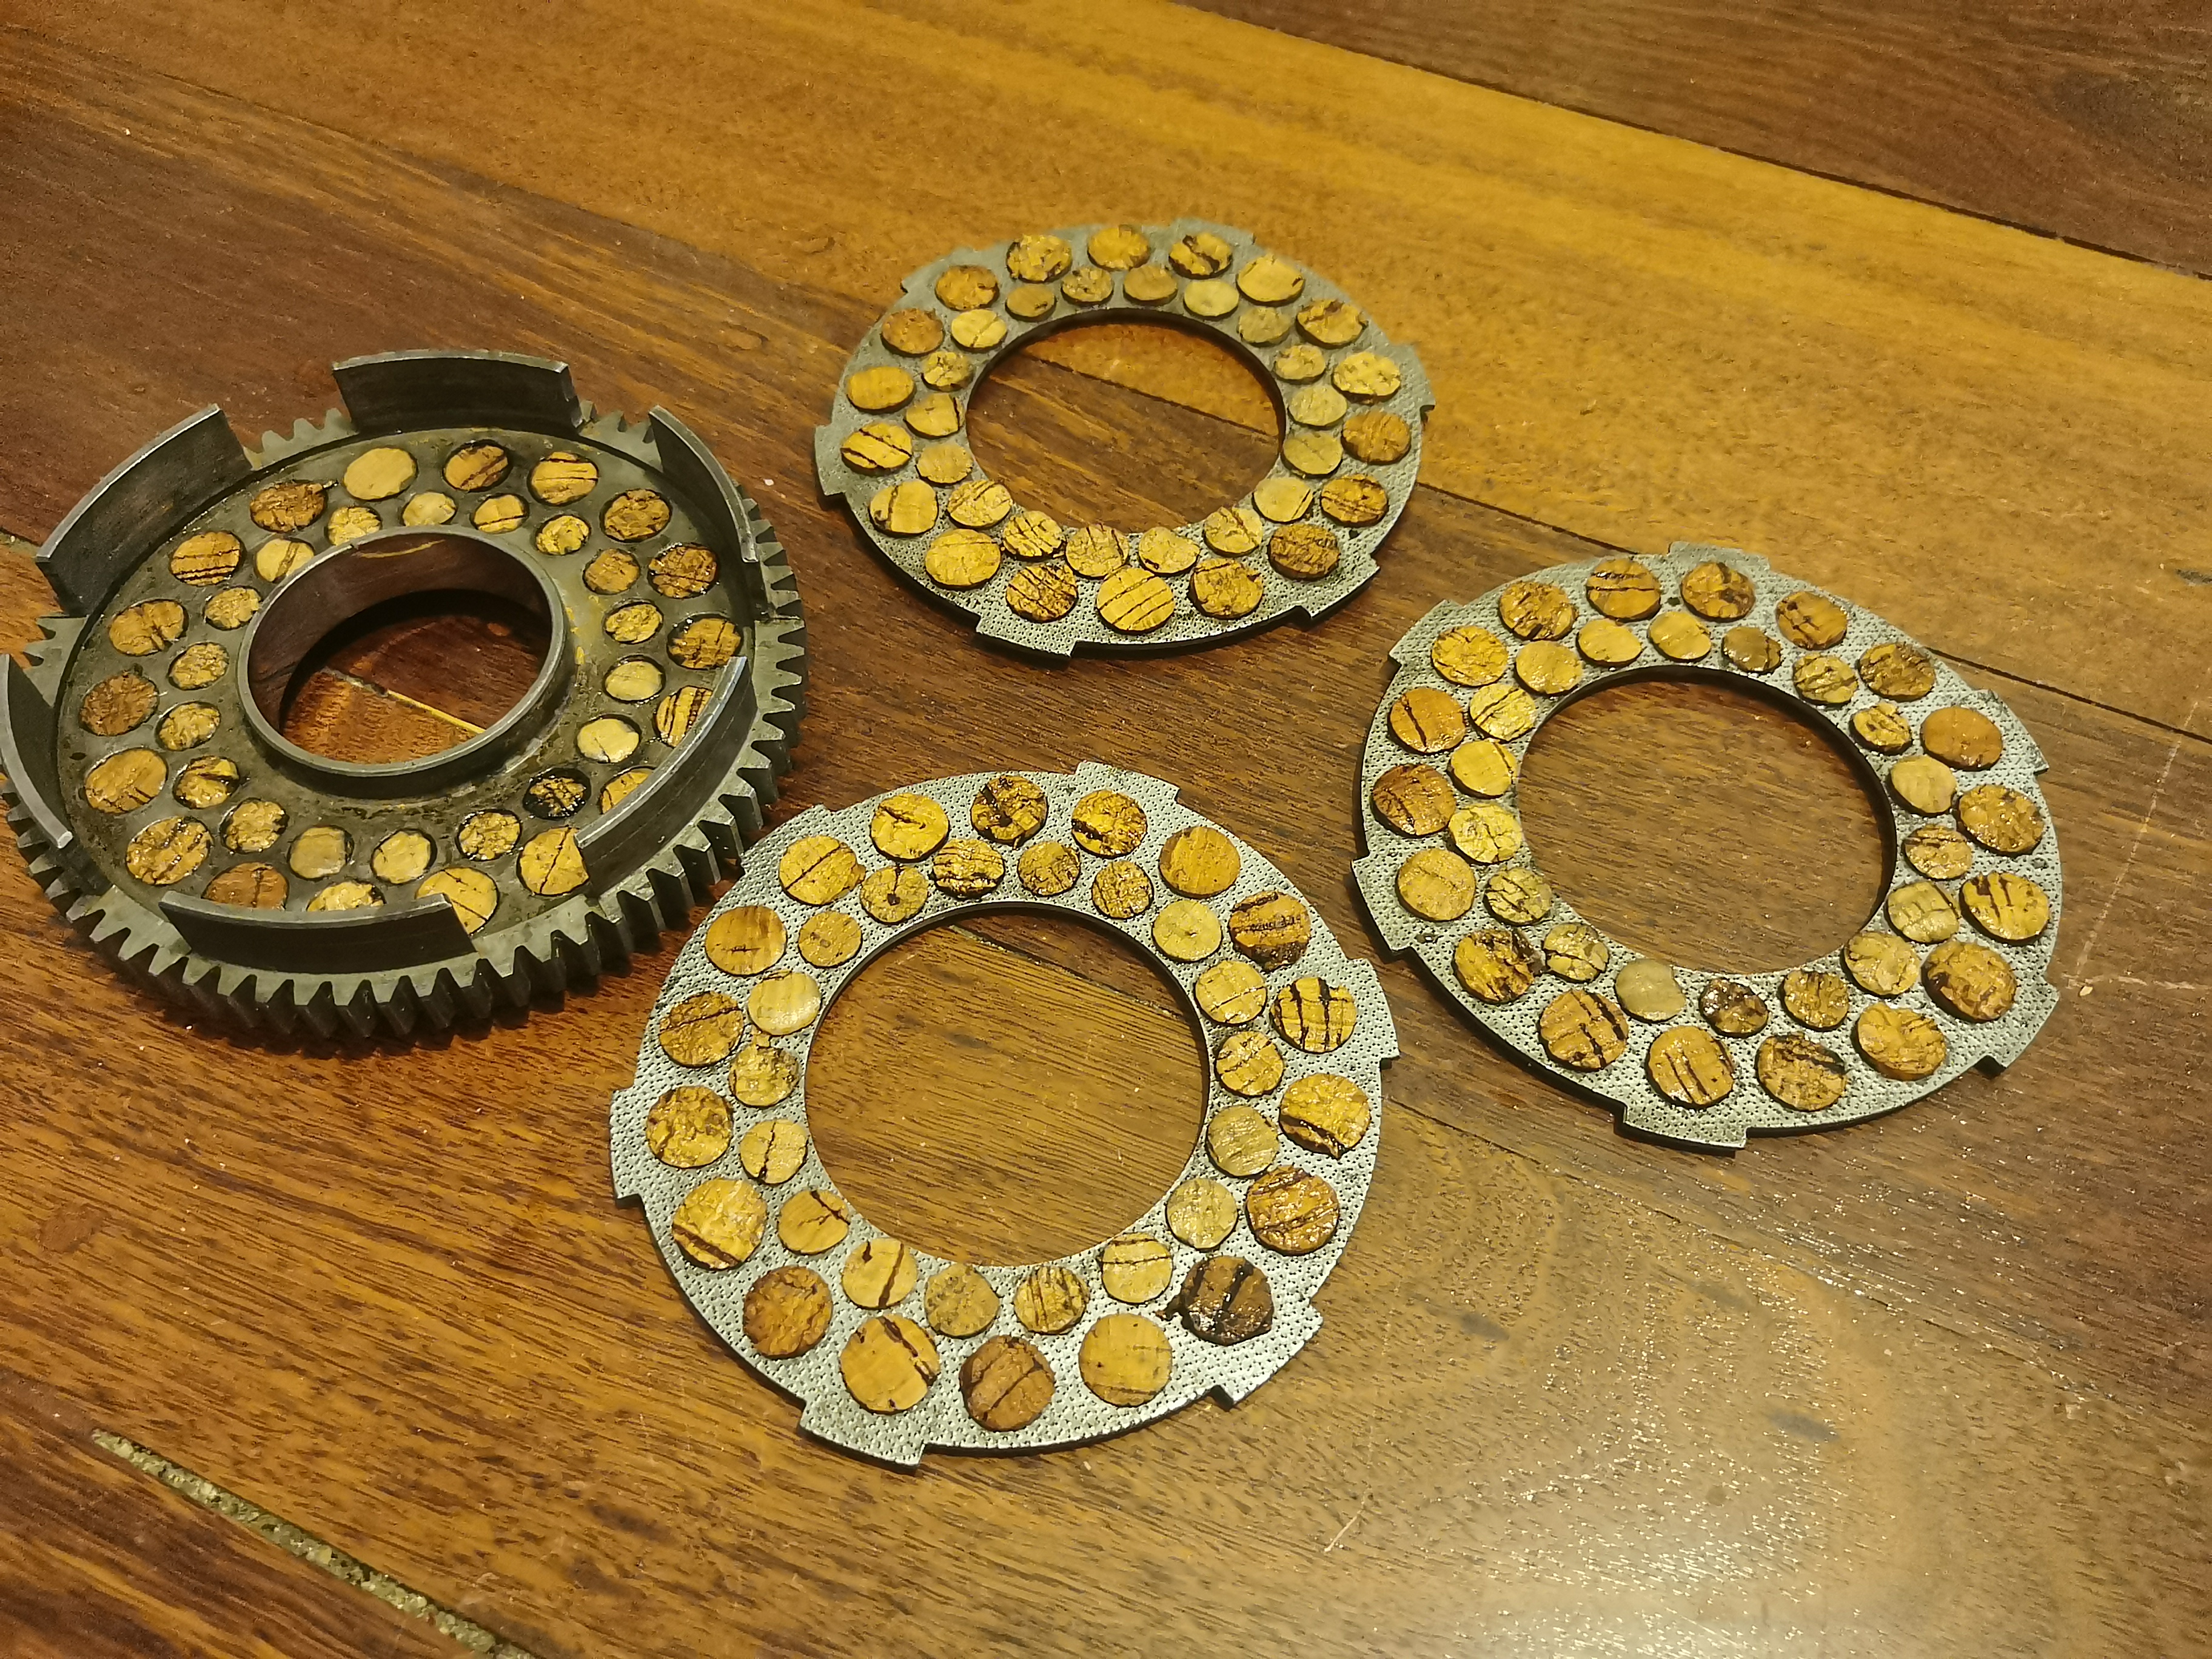
Back in February 2026 I put the bike in the hands of my mechanic friend Kim to sort out the clutch. The clutch had completely failed thanks to a combination of the clutch cable being old, the clutch spindle being completely worn out and the wrong lubrication being used. Kim was able to insert the new clutch spindle, replace the cable and re-sand and replace some of the cork blocks that had broken apart.
However, when putting the clutch back together and attempting to tighten up the primary drive, he found that the crankshaft had an unexpected amount play. Unfortunately, Blogger does not seem to allow me to add a video here and stupid YouTube will not let me insert it here because it's a "short", so if you want to see the video - click here: https://youtube.com/shorts/OoXBjHcg6Zo?si=_s7gBsTZ5sh4uBKf This play is not normal, but not surprising in an 88 year old motorcycle. So, it was time for the motor to come apart. All up, there was some wear of the bearings - which we will now try and source and replace - but the piston and rings were in reasonable condition.
I had often wondered what were the differences between the many very similar models built in the 1930s. It seems to me that most of the differences were internal to the engine, such as the number and placement of the crank bearings.
The drive shaft proved to be.... in rather bad shape. Look at the keyway.
Well, I had not planned on a full engine rebuild, but that's where we are. I've got some more parts to source .....
It's been a while since I wrote about my DKW SB350 restoration. In March 2025, after I got the bike back from Kim's, I took it on a couple of short rides, including taking it to Arthur Grady Day in Fremantle on 17 March. The bikes performance was quite mediocre. First gear was nearly useless and speed was slow. I decoked the exhausts, which reduced smoke but that did not improve riding performance. When I first rode it, it would fire up after only a few kicks, but now it became increasingly difficult to start. Consulting with other owners online, I was advised that the gearbox oil/grease mixture described in the original owners manual was too thin and would cause the cork and steel plates to slip. This also explained the poor traction in first and second gear, so I obtained the recommended lubricant - semi-solid grease from Penrite - drained the gearbox and refilled it.
My bike looks pretty shabby, but the engine cases are polished up. Semi-solid grease is exactly like it says on the tin - think and goopy. The immediate effect was that kick starting improved, so it seems there is more traction on the cork and steel plates. However, gear changing became impossible. One of the problems that Kim and Wayne had highlighted early on was the replacement clutch cable I had purchased at the start of the project did not fit the bike, being almost a foot too short. Why are so many replacement parts crap?!! We reused the original clutch cable, which fortunately had tension adjusters at the top and bottom. that allowed me to get the right tension, but being old and stretched, it would slip and loosen very quickly. This exacerbated another problem - the worn out clutch spindle. Here is a video showing how worn out it was.
When the clutch cable is tight, the spindle is held in place, but as the cable stretches, the spindle wobbles all over the place. The problem is that there are almost NO spares for this part. I was searching for a NOS part for almost six months before I managed to get my hands on one. It was very expensive but.... what can you do?
An engineering company in Germany has subsequently begun manufacturing this part. They can now be purchased through ebay.de. Link to the shop: https://www.ebay.de/itm/127467977064 I also bought another clutch cable, which turned out to fit correctly this time. I've put the bike back in Kim's hands to put it all back together. Hopefully this will sort it out - crossed fingers!
Update 28 February 2026 Kim sorted out the clutch - one of the discs needed re-corking as the height of the corks on one disc was insufficient. The spindle and the new cable made a big difference but then the kick start spring snapped. Kim found that drive sprocket was worn and loose. There was also play in the crankshaft, so we agreed that we'll pull the engine out, strip it down and rebuild it. I had assumed the engine had been rebuilt when I bought it but it seems it was only recommissioned. There you go! More update to follow. Next step: https://dkwautounionproject.blogspot.com/2026/04/1938-dkw-sb350-restoration-update-april.html
After taking the bike for quick test ride it was apparent the engine was low on power, especially in first gear. There were a couple of items I needed to check. The first was to clean out the exhausts, which I was certain were carrying some 80 years of baked in oil residue. The exhausts came out easily enough and quick tap confirmed my suspicions. What fell out of the exhaust pipes were like little lumps of coal! With just a little tapping I had more than a handful of lumps.
A view of the baffles at the fishtail end. Pretty black.
Next step was soaking the exhaust parts in kerosene to loosen the oil residue.
A look down the silencer shows the state of the baffles. After soaking in kerosene I was able to scrub out most of the residue. It wasn't perfect but it was enough to clear the baffles.
Someone suggested to me that you could burn out the remaining residue, so I gave that a go. Unsurprisingly the exhaust 'fired up' and burned for about half an hour, relighting itself periodically with a big 'whoop!' After another round of cleaning up and scrubbing off dirt, mud, oil and rust, I reassembled the pipes and refitted them.
I took the bike on a test ride to the Arthur Grady Day in Fremantle on Saturday 17 May 2025. This was only a short distance from my house - about 2 kilometres. The exhausts smoked a bit and needed some tightening up afterwards. Power is still low, especially in first gear. Next thing to do will be to re-look at the gearbox and clutch lubricant as I think it may not be right. https://heinkelscooter.blogspot.com/2025/05/arthur-grady-day-may-2025.html
I picked up my DKW SB350 at the end of April but I did not get a chance to do anything with until the 1st day of May.
First things first was to try and start it up myself. The choke needs to be on (lever turns towards the rider) and after only a few kicks - during which is made almost no compression noise at all - it fired straight up. The engine quickly settled into a steady idle. Even my 1954 DKW RT250 doesn't idle reliably unless its had time to warm up. After a quick walk around to test everything, it was time to take it for a test ride.
Wayne and Kim had both test ridden the bike as they worked on it and neither had been particularly excited about it. Both reported it was complicated to ride. There were good reasons for this. When Wayne took it for its first test ride, the clutch was barely functional. The clutch has now been recorked. Kim took it for a test ride after reinstalling the clutch, but he found that the replacement clutch cable was about a foot too short, so used the foot clutch. Using the left foot clutch and the right hand gear shifter requires quite a bit of practice on an unfamiliar bike. So I had been prewarned.
I decided to reuse the old clutch cable which, being original, had decent tension adjustors at both ends, so I was able to install and get the correct tension on the hand clutch lever. I must say, I have been very frustrated with many of the reproduction parts, especially the cables. They never fit and are often the wrong length - in this case a foot too short! That's completely unacceptable. This meant not having to worry about the foot clutch pedal. I quickly realised that the foot gear shifter was difficult to use due to its positioning, but the hand gear shifter worked well, so I stuck with that.
My first riding impression was of great instability. This was due to the seat which was not firmly mounted at the front bracket, causing the seat to slip several millimeters each way as you turn. This movement was very disconcerting but was an easy enough fix. I removed the (non-original) bolt securing the seat to the frame and packed in several washers to stop the front of the seat slipping. This allows for the rear-mounted springs to provide cushioning, but not slip from side to side.
The rear wheel foot brake (right side) feels poorly placed. Its obviously placed where it is for heel use, but it needed a lot of adjustment to stop the bike effectively without needing to move your foot too far back. Adjustment was easy enough as the brake rod has a decent adjustor. Fortunately the hand brake was extremely effective and I didn't need to use both brakes on the short, rather slow test ride around the block.
Which brings me to the last thing - power. The engine ran really flat and it was hard to accelerate. There are two things to look at: 1. the exhausts need a damned good decoking. At the silencer end they are completely filled with oil. After another test ride to confirm the brakes and seat issue is solved, I'll remove the exhausts and give them a good clean. And 2. I need to check the carburettor settings and possibly the jet size. By all accounts these bikes will comforably do 110 kph. I think I'd push it to get over 50 kph at the moment.
All in all, a good first test and I think I know what I'm doing now. A big thanks to Wayne, Kim and Gavin for helping get this far.
After we discovered that the clutch was not really operable, the clutch basket was pulled from the bike and I ordered a new set of cork plugs. These arrived surprisingly quickly from Germany on 11 April. See the proceeding post for the details here: https://dkwautounionproject.blogspot.com/2025/04/1938-dkw-sb350-restoration-update-march.html I had cleaned up and polished the metal plates in the proceeding weeks. The condition was pretty good as far as I was concerned.
I had some time over Easter so I set to it. The cork plugs are twice the height required in the clutch, so each plug was cut in half using a craft knife. Some plugs were a little more accurate than others but all will need to be sanded down to a flat surface when they're mounted in the plates.
The cork needs to be boiled to make it soft and pliable enough to fit in the holes. Half an hour on a rolling boil was enough. It must be noted that once out of the hot water they cool down very quickly, so it's best to fit them in small batches while the rest 'cook.'
To my surprise, the cork was very easy to install. There was some inevitable losses due to seams and weaknesses in some of the cork plugs, but the bags contain more than sufficient for two sets of clutches. The bottom plate was actually the easiest to fit. It took about half an hour to fit all the small plugs. The big plugs follow the exact same process.
Almost done.
Job completed. It was a very easy and quite satisfying task. Now, the cork needs to dry as they were thoroughly cooked out.
Once it was dry I gave each of the cork plates a good sand to make them smooth and flat. The cork sanded very easily.
The clutch 'reassembled'. The clutch plates will need a finer sanding to get them to the right thickness and fit. I will leave that to the experts to do as I don't want to sand anything down too far that would undo the good work above. Hopefully this will be the last fix before the bike can be ridden.
And I received the call a few hours after I dropped off the clutch that the bike is now running, rideable and ready for collection!
I've got a few little things to sort out and then learn how to ride it.
It's been a while since I've reported on progress with the DKW SB motorcycle so a recap is in order. I dropped my bike to some mechanic friends to sort out the carburetor and ignition issues back in November 2024. Those issues were quickly resolved, but like the proverbial loose thread on a jumper, other issues quickly unraveled. https://dkwautounionproject.blogspot.com/2024/11/1938-dkw-sb350-restoration-update.html
New tyres were obtained but when the guys removed the old tyres they found that the rims were completely rusted through from the inside. It was probably the rust that was holding them together. New rims were built from NOS stock rims and new spokes.
As the rims were new, they needed to be painted to look 'age appropriate.' They look great.
The guys managed to remove the old speedometer from its housing and install the new speedometer. Apparently there were some very tiny screws in the speedometer back holding it on. The original speedometer housing looks much better than the modern reproduction, which was not a match at all.
Next step was to start her up and take her for a test ride. The clutch proved to be barely functional. Well, after 80 years this is hardly a surprise. We pulled off the covers and took a look at the clutch.
Prewar DKW motorcycles used plates with cork plugs, approximately the same size as a cork bottle stop. Over time these decay and fall apart. As soon as we opened it up some cork plugs fell out.
This ring of cork plugs looks like it was original. All the plugs were consistently sized but blackened and inflexible. You can see some plugs are missing from the disc.
This ring of cork has been repaired / replaced at some point. Some cork plugs are original but replacements have been cut from square pieces of cork, probably from a cork bottle.
It's much more apparent in this disc. A little pressure on the plugs and they all came out easily enough. The metal plates were in good condition.
A new set of corks is on order. Below is a video showing how the cork is fitted.
This will be my next job!
After soaking the plates in petrol....
The cork arrived on 11 April 2025. It only took two weeks from Germany. Generally post from Germany takes 4-6 weeks, but it was a light package.
This is a series of movies by Wedvik Mekaniske following the engine restoration process of a DKW SB 350 1934. The motorcycle was found in a shed, totally dismantled after being started on a restoration process decades ago. The bikes origin is around Femunden in Norway and the bike was probably barely used for transportation purposes. There was very bad infrastructure and barely no roads around Lake Femunden in the 40`s and 50`s and the bike shows evidence of being used in the forest on bad roads. Quite common for woodsmen to use motorcycels for "easy" transportation to work. The bikes life cycle is now ended and the DKW is again back to the same family where it was new. I`m doing the rebuild of the engine and the owner is doing the complete restoration of the bike. The last episode in this series of videos will be with the finished running bike. Hopefully on the nicest DKW´s there is!
Part 1: Dismantle and measuring of piston, piston rings and cylinder
Part 2 - Vapor blasting of head and piston
Part 3: cylinder honing and lacqueringPart 4: carburetor restoration
Part 4: carburetor restoration
Part 5: Nickelplating / Electroplating of bolts and nuts
Part 6: Engine teardown / disassemble
Part 7: Blackening of bolts using engine oil
Part 8: Crankshaft truing
Part 9: Gearbox restoration
Part 10: Cork Clutch rebuild
Part 11: Mounting of crankshaft and cases, measuring of crankshaft sideplay
Part 12: finishing the primary with clutch install and measuring of gear backlash
Part 13: Deburring cylinder ports and adjusting piston rings before mounting
Part 14: Installing electronic ignition and setting the timing - machining needed!