Wanderer Werke AG was founded in Chemnitz by Johann Baptist Winklhofer and Richard Adolf Jaenicke in 1896. They originally manufactured typewriters, industrial tools and bicycles and in 1902 progressed to motorcycles. In 1912 they developed the car that would set them on the path as a fully fledged automobile company, the W1 "Puppchen." The Puppchen was a small, budget car seating two passengers in tandem. It was originally powered by a four-cylinder, four-stroke engine of approximately 1100cc, but rapidly evolved over the next decade, becoming larger and more powerful.

By the late 1920s, the Puppchen and its successors were quite out of date and the company sought outside help to design a new range of vehicles. In 1929, Ferdinand Porsche had been made redundant from Steyr in Austria and decided to strike out on his own as an independent design consultant. Wanderer engaged Porsche to design them a new engine. This would be the Porsche Design Bureau's first contract and it would ultimately make his career. Porsche designed a four cylinder and a six cylinder engine for Wanderer that would become the bedrock of all Wanderer vehicles for the next ten years. These engines were so reliable that they would even find their way in the trucks and tractors Wanderer built for the German war effort and copies would find their way into IFA's military vehicles in East Germany into the 1960s.
https://dkwautounionproject.blogspot.com/2024/07/1956-ifa-p2m-gelandewagen.html

The first Porsche-engined Wanderer was the W21, which went on sale in 1930. Sales of Wanderer's mid-ranged cars continued strongly even through the years of the Great Depression, however, the auto industry in the state of Saxony was in a parlous state, largely due to the enormous debts owed by luxury car markers Audi and Horch, to the State Bank of Saxony. Should either of those companies fail, the State Bank's own survival was at risk. The board of the State Bank approached Jorge Rasmussen of JS Rasmussen and Co to bail out the faltering Audi. JS Rasmussen owned a diverse industrial empire, the jewel of which was the budget auto and motorcycle manufacturer, DKW. With complex debt restructuring, Rasmussen was able to fund the purchase the struggling Audi. Despite Rasmussen's efforts to revitalize the brand, the company proved unsalvageable. In 1931 production of Audi cars was halted and their factory in Zwickau given over to production of DKW budget cars.

Despite challenging economic times, DKW's new budget car, the Frontreib F1 (above), proved to be a hit and the company began to claw its way back into the black. Horch however remained a problem. The State Bank's directors approached Rasmussen again to buy out Horch, but after examining Horch's books, he declined. The purchase of Audi had been an enormous burden on the Rasmussen group and the company had no capital reserve to take on the enormous debts of Horch. Nevertheless, a plan was developed to form an automobile conglomerate comprising DKW, Audi and Horch, separate from the Rasmussen industrial empire (which included such diverse businesses as coal mining, steel smelting, wood-working, a leather tannery, aircraft, refrigerators, motorcycle accessories and specialist industrial parts). The capital for this merger would come from Wanderer, which were forced into the merger by the State Bank. The price Wanderer extracted from the State Bank was a dominant position on the board of the new Auto-Union, something that Jorge Rasmussen was not made aware of. As part of the deal, Wanderer was forced to sell off its motorcycle arm, which was purchased by Czech industrialist, Frantisek Janecek, cousin of Wanderer's founder, Richard Jaenicke. Frantisek Janecek's company would be named Jawa, a contraction of the first letters of his surname and the first letters of Wanderer.
https://dkwautounionproject.blogspot.com/2021/02/jawa-700.html

The new Auto-Union AG economized production by assigning company a specific market segment and removing duplication. DKW served the budget car and motorcycle segment, Wanderer served the middle-class market and Horch serviced the luxury market. The bringing together of the four companies design studio allowed standardization of parts and cross pollination of technical features. For instance, Wanderer cars quickly adopted the DKW 'floating' rear axle, which did much to improve their handling, while the association with Horch saw an uplift in quality fittings.

In 1936 Wanderer introduced a new sportscar - the W25K - to capitalize on the growing affluence of the German middle-class (Horch and DKW also introduced similar roadsters at the same time). The W25K was powered by a six-cylinder 2-litre engine with a compressor in a handsome two-seater roadster body by Baur. Sales were slow however. 149 were built in 1936, 72 in 1937, and 37 in 1938, when the model was withdrawn. Very few examples survive and they are highly desirable today.
The Australian Wanderer W25K

The chances that such a rare vehicle would end up in Australia was always pretty slim, but then stranger things have happened. Consider the 1944 DKW F9 pre-production car owned by Auto-Union technical director, William Werner, that ended up in Australia. After passing through several hands in the 1980s it ended up in the possession of Peter Thorogood, then president of the DKW Club of Victoria. After Peter sold the DKW F9 and it made its way back to Audi Tradition. See the story here:
https://dkwautounionproject.blogspot.com/2021/08/the-werner-dkw-f9.html
After that adventure, Peter managed to acquire a 1938 Wanderer W25K. Peter recollects:
"The car came to Australia in the 1950’s with a migrating Dutch family. [Vehicles were limited and expensive in Australia after the Second World War so immigrants could import one personal vehicle without paying any import duties]. It then went to a Geelong family (I believe the father ran a car repair workshop). Along the way the original engine failed and was replaced with a Vauxhall engine. It then languished in a field under a pine tree for many years before it was eventually saved by DKW club member Bill Sheehan, about 35 years ago. Bill never did anything with it however, and it further deteriorated so a couple of years ago I persuaded him to part with it. The story was the original engine had been buried along with much other mechanical stuff in the garden of the Geelong property, but the family would not let Bill go and dig it up. When I bought the car I went around to the family to see if I could convince them to let me dig in their garden. When I got there the house had been demolished and the land leveled by the Ministry of housing. I paid a large bond and hired an excavator and dug a meter of soil from the whole site and found one saucepan and one boot! I was forced to search in Germany for an engine. Unfortunately, while I managed to find a correct 6 cylinder 2 litre Wanderer engine, it is not the supercharged variety, but beggars cannot be choosers."

The project itself lingered a with Peter as he had to source so many rare parts from Germany before he was in a position to start work. Fortunately, Wanderer specialists in the Auto Union Veteranen Club in Germany were able to assist.

The first step was to fit the chassis with the correct Wanderer engine. From this point however, things began to go wrong. The restoration shop Peter contracted sat on the project, promising to do work that was never done but charging quite liberally. After years of back and forth, Peter managed to get the car back in his garage. Much of the work that was done proved to be of poor quality and would need to be undone.

It took Peter several more years to find a restorer willing to take on the project. No restoration shop likes to pick up another shop's project as there are always doubts over the quality of earlier work. As mentioned, much of what had been done earlier needed to be undone and put right.

Motor Works Garage of Chewton, Victoria. Motor Works specialize in traditional coach-building for prewar cars with steel and aluminum bodywork, as well as mechanical repairs. Now things began to make progress.

The panelwork begins to come together.

Much of the cars bonnet and front end needed to be re-manufactured from scratch.

Back end. Trim is test fitted.

Finishing up the front end and lining up the bonnet.

And a view from the back end.

The car has really taken shape now. Wire wheels have now been refurbished.

Once everything was fitted in place, it was pulled apart for painting. Here is the frame.

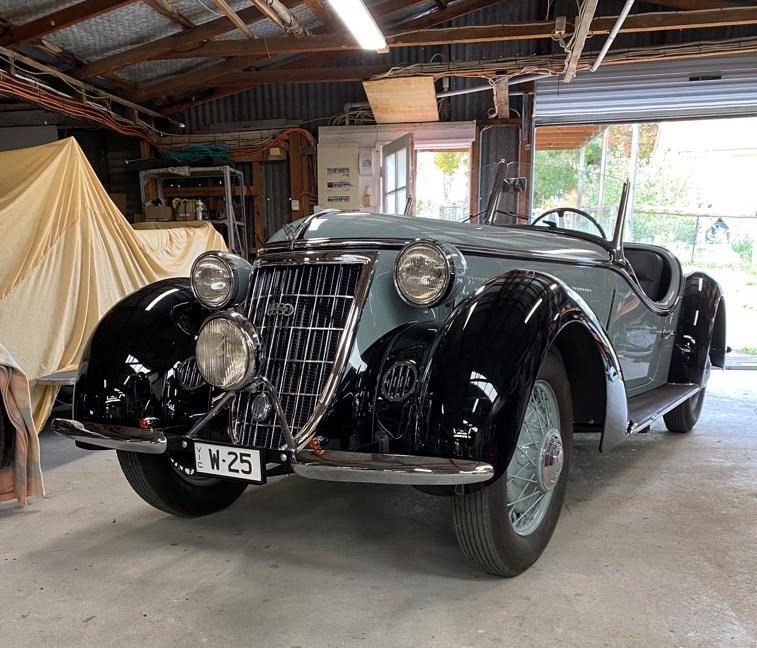
The completed project at the workshop. The car looks absolutely stunning.

And it finally returns home to Peter's garage. Behind the Wanderer is his 1938 DKW SB200. A fine pair.

And so, after a very long and torturous restoration, the project was completed and the car could finally be enjoyed.....but, it would not be. Towards the end of the restoration, with completion in sight, Peter was knocked down by a chronic disease. This sadly put an end to his ability to drive. His son took him on drives in the car (below), but it wasn't the same. Having seen the project through to its successful conclusion, with great regret, Peter was forced to put the car up for sale.

Rarity and quality of restoration are critical contributors to the overall value of a vehicle, but ultimately the decider is interest. If there is no interest, then its hard to achieve a reasonable price. Wanderer is virtually unknown in Australia so there was virtually no market for such an outstanding and unique vehicle in this country, which meant that the car eventually had to be sold overseas. In Germany, these cars are extremely prized so it's no surprise the now calls Germany home. But it is only thanks to Peter Thorogood that the car was saved and restored in the first place. Congratulations on a job well done Peter.
Peter's contribution to the saving of William Werner's 1944 DKW F9 is documented here:
https://dkwautounionproject.blogspot.com/2021/08/the-werner-dkw-f9.html